TLDR: I made a wizard/dragon escape room for my kids for fun. UNLIKE the escape rooms on my website, I didn’t make it to package and sell, but here are some of the resources and clues I made. You can download them for free and use them creatively in your own wizard-themed escape room!
So I love writing the escape rooms I sell on my website, but designing them can be a little restrictive sometimes. I want to only use supplies that are relatively cheap or easy to get, I need to be able to replicate and explain the game easily, and I can’t use any standard measurements (darn Imperial/metric system dichotomy).
Writing escape rooms for my friends and family is fun because it isn’t so restrictive. This summer I decided to do one for my kids and their friends. They’re into the Harry Potter and Wings of Fire book series, so I did a dragon/wizard theme. It was a ton of fun, for me and for the kids!
What follows is a detailed (and lengthy, sorry) explanation of everything: how I set up the game, how running it went, and the clues I created (which you can download for free). It also serves as a bit of a model to how you might create your own DIY escape room using the techniques I lay out in my book, The DIY Escape Room Book, so check that out if this intrigues you. Hopefully this post can help or inspire you as you create your own dragon, wizard, or Harry Potter escape room!
Index
- The Players
- The Room
- The Game
- Lessons learned
- Resources you can download
- Online purchases I made, or had made in the past
- Tutorials I used
- Credits
The Players
I made the game specifically for my kids, and we invited some neighbors/friends/siblings of friends to play too. I ended up running it five times: once with my eight-year-old daughter and my husband as a daddy-daughter activity, once with my nine-year-old son and two of his friends, and three more times with other friends and neighbors, with ages varying from 10 to 18.
The Room
The setting of the game was an evil wizard’s tower. We have a guest bedroom upstairs, which I converted into the escape room. It was very convenient because it could sit undisturbed for weeks while I slowly worked on the clues and decorations. My kids (and me) got into the habit of calling it the “Chamber of Secrets” because I wouldn’t let them inside. (That was a lot of fun to hear around the house: “Remember, you’re not allowed in the Chamber of Secrets!” “Has anyone been in the Chamber of Secrets?” “When you play hide and seek, make sure your friends know not to hide in the Chamber of Secrets!”)

To decorate, I used a lot of stuff I had on hand, like Christmas lights and Halloween decorations. I also had some brick-patterned temporary wallpaper, and I used that to cover all the drawers and cabinets I didn’t want the kids to waste time searching through. It worked great. It was very clear to everyone that they didn’t need to search through the drawers, and the wallpaper looked a lot cooler than blue painter’s tape would have looked (which is what I usually use to mark things that players in an escape room shouldn’t open).

I will say that the temporary wallpaper did a little more damage to the furniture than I was hoping. It chipped the paint in a couple of small spots and left a sticky residue on the metal drawer handles (though the residue did come off). Nothing too bad, but just something to keep in mind if you do ever use temporary wallpaper somewhere other than walls.
I did buy some new supplies for decorations for the escape room (like flickering LED lights). I also bought some feathers that I made “quills” out of. Combined with some manila paper I cut and rolled to look like scrolls, they made for a fun decoration/note-taking tool.


For any escape room that takes place in the past (even a fictitious past), a thrift store is an excellent place to shop for decorations or clues. I found some way cool stuff at a small-town thrift store, like some pewter cups and a variety of jars and candle holders.

I was really happy with the way the room ended up looking. For the things in the room that didn’t have such a “wizard’s tower” vibe, I did the best I could. I put a plain brown blanket on the bed instead of the modern gray one that’s usually there. I got rid of the pillows and all the other decor normally in the room. I used Christmas lights instead of the bright overhead light.
To make the vanity bathroom in the room feel more like part of the game, I didn’t use the vanity lights but instead used strand lights, and I used the counter and sink as the location for a potion puzzle. It was a perfect place to hold all the jars, most of which were filled with liquid, and it kept any messes contained. Plus I think it ended up looking really cool!
The Game
The plot of the game was pretty simple: there’s an evil wizard trying to control the dragons, you’re protectors of the dragons, the wizard locked you in his tower, you need to find a way out and, if you can, a way to keep him from taking over the dragons. Not the best plot, I admit. Usually I like to create a detailed story and set up my games with an intro I read out loud, but this time I actually really liked the minimal plot. I could say it in a couple sentences without reading it from a paper. For kids, it felt easy and natural that way.
The game was structured around a spell book. It had both a spell and a potion inside that the kids needed to complete to escape the room. I left two blanks in the spell and four blanks in the potion recipe. Various puzzles in the room led the kids to fill in the six blanks.

To make the spell book, I used a 4×6 leather photo album I gave to my husband as an anniversary gift years ago (he was nice enough to let me borrow it). It was perfect – it felt old-timey and fitting. I designed and printed the spell book pages and cut them all to be 4×6 so I could just slide them into the photo album.

The spell book had a few pages that were important (the pages with the spells, for example), and the rest were pages with Latin-sounding placeholder text and pictures of various dragons, animals, and plants. I used a very tiny hard-to-read font so the players wouldn’t waste time thinking they had to translate all the text in the spell book (they didn’t). The extra pages were there just to make the spell book feel more complete and fun.
If you don’t have a leather photo album, the download has a cover page you can use with an inexpensive plastic photo album, or you can bind the pages however you want.
Since the game was for kids, I wanted it to be fairly straightforward, so I marked each blank in the spell book with a number. The clues in the room were all marked with numbers in the same style, making it clear which clues went together.

This did help, but I think the fact that the room was non-linear (no exact order to work in) still made it difficult, even for the teens.
Puzzle 1 – Glow in the dark paint
The first blank was a word (indago) to complete the spell. I hid this clue in the closet of the bedroom. I painted the word in glow-in-the-dark paint on a piece of cardboard and taped it above the door in the closet.
I also cleared all the other stuff out of the closet to keep the kids from thinking they had to search through it. To give the kids the hint to look at the clue in the dark, I taped a note on the wall so it was the first thing the kids saw when they opened the door. It said: “Come inside, turn off the light, and close the door.” So mysterious!
I chose to tape the glow-in-the-dark clue high above the door to keep the kids from noticing it in the light, because you could still read the glow-in-the-dark word fairly clearly even with the lights on.

I tried hard to prevent this by using layers of other white and pearlescent paint, and it was a little disappointing that the neutral glow-in-the-dark acrylic paint came out so visible, but it ended up OK. It was a fun reveal for the players, looking around the pitch-black closet until they looked up and saw the glow-in-the-dark word.

Taping the word up high close to the light (which I left on during the game) also helped it glow extra brightly because it could soak up a lot of light.
To make this puzzle longer, I locked the closet door shut with a chain and keyed lock (securing the chain around the bed fame and the doorknob of the closet).
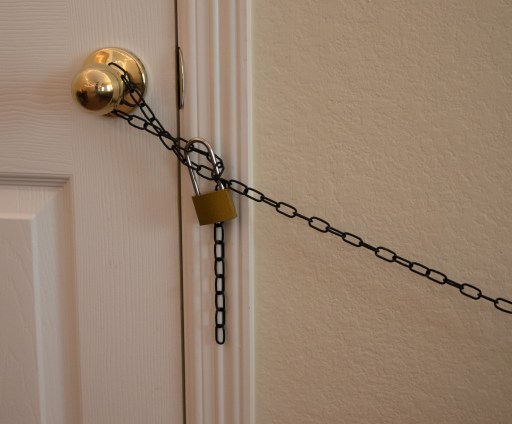
Then I hid the key pretty well in this jewelry box filled with jewelry and fake gems. The outside of the jewelry box was marked with a 1, so it was clear that the key went to the closet door (which was also marked with a 1).

Puzzle 2 – Searching through a cauldron for a lock and combination
The second blank was another word (colligo) to a spell the kids needed to say out loud. For this word, I folded up a piece of cardstock multiple times and drilled a hole in it. Then I unfolded the paper and wrote the word on it. Then I re-folded the paper and locked a combination lock on it. Because the paper was folded so many times, it was impossible to read the word without opening the lock. It was pretty impossible to even tear the paper because it was so thick.

Handy tip: Locking paper, especially cardstock, is a good inexpensive option if you don’t have a box or container you can lock easily.
I wasn’t quite sure what to do with this lock at first. My idea was to have the kids search through something like beans or rice. I thought it would be a fun tactile experience. I had a cauldron from our Halloween decorations which I thought would make a good container. I just needed to find something to fill the cauldron. I thought about beans, shredded paper… I couldn’t really find something good, not too messy, and inexpensive until I was cleaning up a craft my kids had just done. We made diorama-type boxes with animals and rocks and fake plants and all sorts of nature items. I ended up just dumping them all in the cauldron, and I think it actually worked pretty well. I hid the lock at the bottom, so the kids had to search through the moss, leaves, and rocks until they found it.

The combination to the lock was hidden in the cauldron, too. I made clay circles that had the five numbers of the combination written on them. I was planning on hiding them in a separate location, but I ended up just hiding them in the cauldron, too, and I think that worked well, especially because the numbers kind of looked like rocks and weren’t super easy to spot right away. I think it was the perfect difficulty level.

Puzzle 3 – Using a touch box
The third blank the kids had to fill in was an ingredient in the potion: powdered bat bones. This clue was probably the most labor-intensive and costly to assemble, but it was fun and I really wanted to do it. I made a touch box out of a cardboard box and black fabric. Inside there was a prop bat skeleton (another borrowed Halloween decoration).

To make the touch box, I used an old Amazon box. I cut a hole in it big enough for a hand to go in, then I lined the inside in black fabric. I put the bat skeleton in, closed the box, and wrapped it in more black fabric. I also used thread to secure the bat to the cardboard box. It was too big to pull out of the hole, but I didn’t want the kids to try to pull it close to the hole to peek at it. So I used a huge thick needle to punch through the cardboard and made extra sure the skeleton was secure. (Well, almost. It turns out one of the last groups was able to yank the bat free and pull its head out of the hole.)
The second part of the clue was this foam board with these animal skeletons. I wrapped the foam board in black fabric, duct taping it in the back. Then I used the same needle and some fishing line to sew the skeletons securely to the board.

I was really happy with the way the puzzle turned out. It felt appropriately creepy for an evil wizard’s tower, and I found a way to tie the whole board to the bed so the kids could feel the animal bones but not pick them up and carry them around. This was partly to increase the difficulty; players would have to feel the touch box, then move to the other side of the room to feel the other skeletons and identify the right one. Securing it to the bed also conveniently hid the back of the board, which was not-so-prettily covered in duct tape and knots of fishing wire.
Everyone figured out without too much trouble that it was a bat inside the touch box. A couple of the kids were a little hesitant to stick their hands inside a mysterious dark box, which is always fun. But I think it was the perfect difficulty level.
Puzzle 4 – A potion, a cryptex, and a physical puzzle
The next blank was another potion ingredient: unicorn milk. For this, I printed off a stylized outline of a unicorn and mod-podged it onto little popsicle sticks to make a mini puzzle. There were only eight pieces, so it wasn’t too difficult or time consuming for anyone to put together.

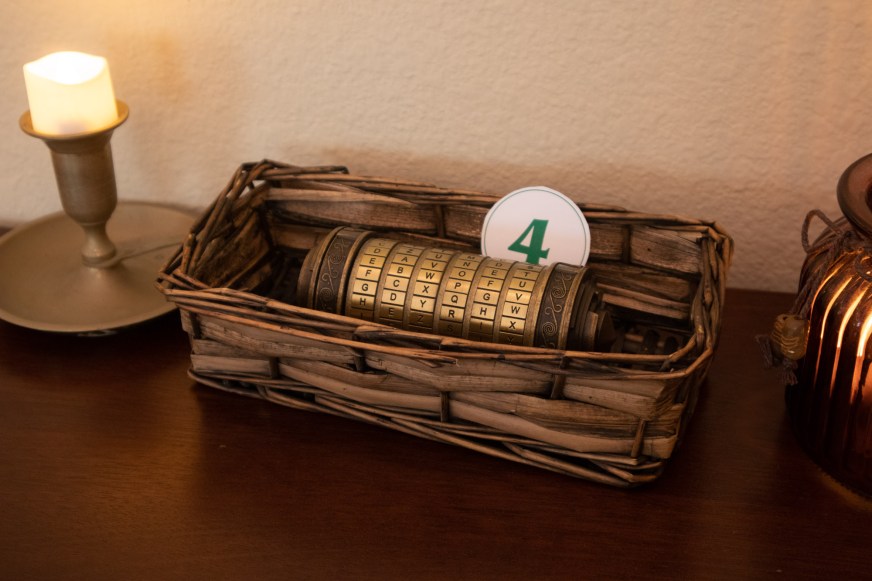
I put the pieces in this cryptex, a cylindrical vault locked with a six-letter password (secret).
Then I read about an idea online that I loved involving a pretend potion. I printed a paper label with “Insight Potion” on the outside and, on the reverse side, a message that said “the password is secret.” I taped the label securely to the bottle. Then I needed to fill the bottle with an opaque liquid so the message wouldn’t be revealed until the kids drank the “potion.”

The drink I settled on was mango nectar; I didn’t want soda because it would be easy to identify, and I didn’t want anything kids would think was “gross” like tomato juice. I thought the mango nectar would be unusual enough so the kids weren’t like, “Yep, that’s root beer,” but still taste OK. For extra fun and to make it look less like an orange juice, I put some food coloring in it.

It was fun to see the various reactions to this clue. Many players were hesitant to drink it. Some of them only took a sip, and it took a while (or a hint) for them to realize they needed to drink the whole thing.
I think one of the fun parts of an escape room is coming across something where you think, “Am I supposed to…? Is this really part of the game?” And you’re not exactly sure if you should proceed. But then you hesitantly go ahead with it and it turns out there was a clue there all along. That’s how this clue felt for many of the players. Which made it just as fun for me to watch.
There was only one group where all the players thought the potion was so disgusting, they wouldn’t drink it at all. I tried to tell them someone needed to take one for the team and just drink it, but in the end they poured it down the sink. [Eye roll] I think the green food coloring threw them off. Or they just really hate mango nectar.
Anyway, after the kids drank (or poured out) the potion, they were able to read the message, unlock the cryptex, and put together the puzzle.
Puzzle 5 – A scrambled word
The fifth blank was another potion ingredient: squid eggs. For the clue, I made some dragon eggs (mostly because I saw this tutorial online and they just looked so cool I had to make some). I thought they turned out great.

Then, in the same spell book with the spell and potion recipe, I added a bunch of different pages with illustrated dragon eggs.
The five eggs I made were all illustrated in the book (and lots of others eggs were too, many drawn by my children, who were eager to help). Each egg page had a letter on it. The five eggs I included in the room had the letters S, Q, U, I, and D, which unscrambled to spell “squid.”

This puzzle ended up being a little too tricky for the younger players. The oldest players figured it out by themselves, but I’m not sure if the younger ones would have been able to get it without a hint.
Puzzle 6 – A secret code
The last blank was the last potion ingredient, which I called “alpaca fluff.” (I wanted to put tasty things into the potion, and I thought that cotton candy varied it up some from liquids.)
This was probably the hardest puzzle for the first two groups, and they needed help from me to solve it, but not because it was difficult. It was more due to the puzzle design.
To make the puzzle, I found a cool font of mage-script-looking characters and switched the letters for symbols. I printed the translated-into-symbols text and hid it in the room.

Perhaps I hid it a little too well; I taped it inside the rim of this box.

It did take a lot of searching. For some groups, after lots of searching it made for a fun little “a-ha” moment when the players finally found it. Other groups needed a hint. I also learned that leaving the box empty (as opposed to containing a red herring) made it easier.
I wanted the decoder to this text to be something different and physical, so I got six strings and attached an English letter to one end and its corresponding symbol to the other. Then I put them all in a chest. The kids just needed to separate the strings to see which letter went with which symbol.

Unfortunately, the strings were a huge mess and took forever to untangle. Maybe I just made them too long. When I did the room for my husband and daughter, I intentionally jumbled them up a little before putting them in the chest. But when my husband found them, they had magically worked themselves into such an awful tangle, I sat on the floor and worked on it while they continued solving the room. It took forever to separate it out.
So for the next game, I tried to jumble the strings less…but somehow I think I made an even bigger mess than the first time! It also didn’t help that when the kids opened the chest, they just grabbed the wad of string, held it, tossed it around, and passed it back and forth a few times, just making the tangled mess even bigger without attempting to undo it.
By the time they got around to working on the puzzle, I offered again to untangle it for them. But it was taking forever (seriously, those strings were a huge, huge mess), so I instead gave them a hint to look at the letters in the decoder and see which potion ingredient on the counter had the same letters. One of the kids found it pretty quickly. (There was actually one other ingredient that had the same letters, calf pulp, which sounds disgusting but was the only thing I could think of with those same letters to make a distracter with. Luckily, they didn’t even notice the distracter, so I didn’t bring it up.)
The other times I ran the room, I tried really hard to lay the strings in the chest as neatly as possible. That worked great. The strings were so long, there was still some untangling involved, but it was much more manageable. A good lesson on always testing your individual clues, I guess!
Puzzle 7 – Mixing a potion
After all six blanks were filled in, the kids were able to mix the potion. This was one of my favorite parts of the game (and actually most everyone else’s favorite part, too). I’ve been wanting to make a puzzle like this since I saw this video of a magic-themed escape room for adults (caution, the video does have some language). So I’ve been collecting cool glass bottles and jars for a few years now, making assembling the puzzle a lot easier. It was just super fun to put together, making up all the ingredients and labels and finding things to fill them with.

(For tips on collecting jars like this, try craft stores, dollar stores, thrift stores, and even jars and bottles from food in your fridge or pantry, removing the labels and washing them well after you’re done with them. Goo Gone is my best friend when it comes to repurposing food bottles and jars, because sometimes the sticky residue from the labels is really hard to get off. At craft stores, you can buy loose corks of various sizes to go with glass bottles you might already have.)
It was actually a little challenging at first to come up with fictional potion ingredients, so I ended up making this spreadsheet, which I now offer to you! I listed out all the animals, animal parts, plants, and plant parts I could think of, making it easier to create unique ingredients (some of them sound pretty gross, so use whichever ones you want).
These are the ingredients I ended up using in the potion, and what real-life ingredients I used to represent them:
| Fictional Ingredient | Actual Food Item |
| Juice from a warthog’s intestines | Cooked spaghetti in water dyed with blue and red food coloring |
| Snake venom | Water |
| Powdered bat bones | Powdered vanilla pudding mix |
| Moonwort slime | Pudding (either chocolate, or vanilla with green food coloring) |
| Unicorn milk | Coconut milk |
| Crushed dragonfly wings | Powdered drink mix |
| Squid eggs | Bursting boba |
| Alpaca fluff | Cotton candy |

These are more ingredients I added as distracters. The kids didn’t actually add them to their potion:
| Fictional Ingredient | Actual Food Item |
| Catfish eggs | Canned peas, in orange water to make them look a little less like peas (rounds 1 and 2) or homemade pomegranate juice “caviar” (rounds 3, 4, and 5) |
| Manticore blood | Tomato juice |
| Platypus eggs | Whole new potatoes from a can (I hand-selected the most egg-shaped ones) |
| Calf pulp | Oatmeal (round 1), Cream of Wheat with food coloring (round 2), or canned stewed tomatoes (seeds removed) with a tiny drop of green food coloring (rounds 3, 4, and 5). The stewed tomatoes looked the best (and also by far the most disgusting). |
| Sparrow entrails | Lentil soup (rounds 1 and 2) or angel hair pasta with green food coloring (rounds 3, 4, and 5) |
| Octopus ink | Water with a blend of food coloring colors to look black |
| Boiled iguana eggs | Chickpeas in colored water (rounds 1 and 2) or blue homemade “caviar” (rounds 3, 4, and 5) |
| Armadillo bile | Water with green food coloring (and just a little coconut milk to make it a little thicker and less transparent) |
| Sloth urine (sorry, this was the grossest) | Water with yellow food coloring |
| Rat and scorpion bones | Powdered vanilla pudding mix |
| Badger and cockroach milk | Coconut milk |

My science-loving son informed me that some of my ingredients were off—like apparently scorpions don’t have bones and platypus eggs are a lot smaller than the potatoes I used to represent them—but I was OK giving up some realism for the overall effect of the puzzle. 😉
Making the homemade “caviar” for the catfish and iguana eggs was a lot of fun. I followed this tutorial, which worked pretty well. Instead of coffee, I used pomegranate juice or water with food coloring. It took a little trial and error and I wasn’t any good at getting all the little drops to be the same size and shape, but it worked well enough for what I needed it to do. Definitely a fun ingredient on the counter, and if you’re up for a little food crafting, something that would be really fun for any wizard or Harry Potter escape room prop, especially because it’s safely edible. (Since mine was just a distracter, I left them coated in vegetable oil, but if I had wanted the kids to actually eat them, I would have tried to wash the oil off and made them taste better.)

I didn’t want the potion to be too gross, so all of the ingredients the kids had to add were sweet or flavorless. Not that the end result was tasty (kind of a watered-down Kool-aid taste–I know because I tested it in advance to make sure), but at least it wasn’t disgusting. Still, you would have thought it was made of actual moonwort slime, bat bones, and squid eggs based on the way some of the kids acted when they had to drink it, going on and on about how gross it was. So dramatic!
The last part of the potion recipe was that the potion had to be sipped through “the hollow bone of a griffin wing.” I used gold paper straws for this, and I did this mostly for cleanliness reasons; if more than one child wanted to taste the potion, they could use their own straws and not put their lips on the cup. Plus without the straws they probably would have had difficulty drinking out of the oddly-shaped pewter mug the recipe called for (which was just too cool not to use). Plus I think it gave a hint to the kids that they only had to take a sip of the potion and not drink all of it.

Included in the potion bar were some tiny metal measuring spoons and some little glass pipettes (which I think I got in the pharmacy section from Walmart). I think these helped the potion puzzle feel more realistic and cool. When you’re measuring out drops of intestine juice with a pipette or tiny spoonfuls of moonwort slime, it’s just really hard not to feel like you’re in a Harry Potter movie. 🙂

My last tip on doing a potion puzzle like this is making sure no one in your room has any food allergies before you start. It wasn’t something I thought about until one child started asking questions about the ingredients during the game. I ended up telling her what all the ingredients were, and everything was safe for her, but from then on I started the room by asking, “Does anyone have any food allergies?” I found this was also a nice way to work in a subtle hint that they would be eating or drinking things in the room, without having to tell them directly (contributing to that, “Wait, is this part of the game?” feeling I think is so fun).
Puzzle 8 – Solving a riddle
At this point in the game, I needed a way to give the kids some information (a combination to a lock), but I didn’t want to just tell them the combination out loud. I tried to keep myself as removed from the game as possible; I was only there to give hints. So I planned to use our HomePod Mini and wirelessly play the combination over the speaker during the game, once the players mixed the potion correctly and drank it.
To do this, I needed to find something to cover the HomePod and disguise it (so it didn’t look like a HomePod). I went back and forth on this, searching for the perfect thing and feeling like I just couldn’t find it. I envisioned something kind of see-through so you could see light shining underneath (I thought I’d add some more lights to make it more mysterious). But it couldn’t be completely see-through. I was thinking at first of coming up with some metal frame and lining the inside with tissue paper.
It took a while, and I wasn’t completely satisfied with the result, but I ended up using the glass cover to a ceiling light fixture I had taken out of another room a while ago. It was big enough to cover the HomePod and some color-changing LED lights. The only problem was the hole in the top of the glass dome, so I used a cheap glass cup coated with mod podge on the inside to make it not transparent, but still able to show light.

Again, I wasn’t thrilled with the way it turned out, but I think it worked OK. The players didn’t seem to think it was too odd or lame looking. My husband thought it was awesome though, and was quite impressed. I called it the “Glowing Talisman” and put a sign by it that read “HIGH CONCENTRATION OF MAGICAL ENERGY: DO NOT TOUCH” to keep the kids from touching it or taking it apart.
It worked well; all the players were all obedient—well, with a few exceptions. Someone thought it was funny to touch it and pretend to get zapped by the magical energy and thrown across the room, and someone else seemed to think the paper sign was a trick and I had to stop her from taking the clue apart. But since the majority of the time it worked, I think it shows that, as long as there’s an in-game reason for a rule or guideline, players are likely to keep it.
The spell book explained what to do with the Glowing Talisman: it holds the answers to all questions, and if you drink the right potion and say the right spell, it will give you the knowledge you seek.

The potion in the spell book was labeled “Lock Combination Potion,” which I hoped would make it pretty clear to the kids what they needed to do.
So once the kids drank the potion, they stood before the “Glowing Talisman” and recited the spell from the spell book, then stood and waited for it to give the answer. At this point I surreptitiously used my phone to play a pre-recorded riddle over the HomePod mini:
The lock’s three digits are found in this riddle:
Count a spider’s legs for the one in the middle.
The first is the number of wings on a bird.
Hold the dragon eggs for a clue to the third.
The lock will open with these digits three;
Solve this riddle and the scissors you’ll free.
And, to make this riddle even more fun, I decided not to record it myself since everyone would recognize my voice. Same with my husband’s. Since I wanted to use a voice none of my kids were familiar with, we ended up hiring a voice actor on Upwork. This is a website my husband uses for his private consulting business all the time. You can hire great freelancers for all sorts of contract work, like graphic design, coding, and even voice acting. Such a small project wasn’t that expensive either ($5 to $15, depending on the actor). I was really happy with the way it turned out and really pleased with the actor.
Some groups needed to hear the riddle more than once, but eventually they all got it. Once they solved it to get the combination (285), they could unlock a combination lock that secured a pair of scissors, then use the scissors to cut a cable tie on a bottle.


Once they did that, they could open the bottle and find two things: 1) a magical amulet that, according to the spell book, will allow them to free the dragons, and 2) the key to the room.

And then they were out! I made the amulet with polymer clay (the look is inspired by the one from Mrs. Brisby and the Secret of NIMH—anyone else remember that surprisingly-creepy-in-retrospect movie from their childhood?)
Lessons Learned
Every time I run an escape room I learn valuable lessons on hosting DIY escape rooms, and this time was no different.
1. Instruct players how to open unfamiliar locks before the game starts.
There were two types of locks in my escape room that the players had never seen before. One was called a push button lock, which had buttons labeled with numbers that needed to be pushed in for the lock to work, but the order didn’t matter. The other was a number combination lock, but it had a button to press once you entered the combination to make the lock open.
Unfortunately, for the first two games, I didn’t think to tell players about these locks before the game started. Instead I had to give some hasty instructions during the game once the players found the lock, afraid that they would get the right combination but not know how to work the lock and get frustrated. This felt out of place. It interrupted the flow of the game and made the experience feel less real.
The other times I ran the game, I had pictures of the same type of locks in the room that I showed the players before they went in. They weren’t the exact locks in the room, but they were similar enough that I could explain how the locks worked before the game started, which worked perfectly.
2. Smaller groups are better (especially with kids). Larger groups increase the difficulty.
Watching my husband and daughter play the game was a lot of fun. He was there to guide her, so they didn’t get stuck a lot, and she clearly had a lot of fun. In fact, when they opened the final bottle, she was disappointed that the key was inside because she didn’t want the room to end. Then she wanted to stay and play in it for a while, which I was fine with 🙂
Since she was disappointed that they finished early (in about 40 minutes), I vowed that I wouldn’t say a thing in the boys’ room unless they asked for a hint (I’m awful at that). However, that didn’t last. I ended up giving a lot of unsolicited hints, and if I hadn’t, they wouldn’t have finished in an hour.
I thought that since the boys were all older than my daughter, they would find the room easier. But it was definitely more of a challenge for them. This might be because they didn’t have an adult helping them, but I also think that with children, the larger the group, the harder it is (slash–no offense to anyone–the dumber they are). In this case, even a group of three changed the dynamic. I could see it, watching my son with his friends. His personality changes a little. He’s more excitable, more apt to show off a little by being silly. They all were, just kind of loud and rushing around the room and not using a lot of critical thinking. They’re all very smart boys; I just think having them work together in a room without an older player made the game harder. Maybe even one older teen in the room would have helped a lot.
All the other times I ran the room, there were only two players at a time, which actually felt perfect.
From all this, I came up with some advice to players (especially kids) who are doing an escape room:
- Take your time to think carefully.
- Keep your clues organized.
- If something doesn’t make sense or is frustrating, leave it alone for the time being or give someone else a turn with it, then find something else to work on.
- If you don’t know what else to work on, use a hint.
3. Use distracters carefully.
On a multiple choice test, a distracter is one of the wrong answers—something that looks like it could be the right answer but isn’t, to test if a student really knows the information.
You can use distracters in an escape room, too. For example, in the potion puzzle I set up, if I only included the ingredients needed for the potion in the room, it would have been pretty easy. There wouldn’t have been any ingredients the players needed to eliminate. So instead I doubled the amount of ingredients in the room, making the puzzle harder (and also a lot more fun to set up).
But distracters make a room harder, and I think it’s important to know your players when you’re using them. Another distracter I used in the room were some extra potion recipes in the spell book. They were meaningless to the game, and I tried to make that fairly clear. (They were labeled specifically to find hidden treasure or the lost city, and none of the ingredients they called for could be found in the room.)
I put the extra spells in for a few reasons. One, like I said, to increase the difficulty. But I also wanted the spell book to feel more “real,” and it wouldn’t be super realistic to have a spell book with only one potion in it, right? So I included the two distracter spells (it originally was going to be more).
For some players, I think this proved to be too hard. They saw the first potion in the book and focused for a long time on trying to make it (which was hard considering they didn’t have any of the ingredients). It took them longer than I thought it would for them to move on to something else (and they needed a hint).
4. Watch out for accidental red herrings.
A red herring in an escape room is something that misleads the players, something they might think is important but actually isn’t. Usually I try to stay away from them, but I accidentally left one in the room that one group got hung up on for a long time.
Inside the jewelry box where I hid the key to the closet, I left a bunch of jewelry I found from a thrift store to make finding the key more difficult. But one of the necklaces had a decorative key hanging from it. I didn’t even think about it when I left it in the room, but it was enough to distract one group of players. As soon as they found it, they searched all over for the thing it unlocked. I felt so bad because they were wasting their time!
5. Make sure players can’t cheat.
The most disappointing moment in hosting the room came when one group played, and they realized that with patience, they could slowly cut through the cable tie on the bottle even with the scissors locked shut. This was at the beginning of the game, and I quietly let them work on it for a while, thinking they wouldn’t be able to open it and would eventually move on to the actual game, but when I saw that they were about to open it, I stepped in and said no; not allowed. That didn’t feel super cool to have to do (interrupting the game and interfering with the realism), but I didn’t want them to miss the whole game! I don’t think they would have wanted to, either. But I should have been smarter in my game design and made sure there was no way the players could have cheated (probably by buying cable ties somewhere other than the dollar store).
6. If you’re hosting a room more than once, keep in mind how much setup the game will take.
I ended up running the room five times, and for almost everything, the setup was pretty easy. I had to rinse and refill the Insight Potion and put a few things back, but by far the hardest part to set up was the potion puzzle. Since I hosted the five games on four separate days, many of the potion ingredients had to be thrown out and then added again the next time the game was played (since they were perishable and I didn’t want them to spoil). By the last few rounds of the game, I decided not to throw them out but just store them in the fridge. Kind of fun(/annoying) because it left our fridge looking like this for a day.

9. Keep readability of numbers and letters in mind.
I always forget to do this. In my room, I had capital I’s that looked like lowercase L’s that looked like the number 1. I had 6’s and 9’s that got mixed up. For the older kids, this felt like it appropriately added to the difficulty. But for the younger kids, it felt too hard. I didn’t even think about it when I was putting the room together. So, as a tip, if you want to be extra clear, underline numbers and letters that might be confused with other numbers or letters, or use fonts that reduce confusion.
8. People still have fun.
I was worried when some groups played that they would have a bad time, because of various reasons (the potion was too gross to drink, I had to stop them from cheating, they got hung up on a red herring, one puzzle was just too difficult). But when everyone got out of the room, they all said what a great time they had and how much fun it was.
I’ve seen this in other escape rooms I’ve hosted, too. I feel like I keep chasing that one room where everything goes perfectly, but it rarely does. But even when it’s not perfect, more often than not, people have fun and make memories, and that’s what matters.
Resources you can download
Below you can download any of these resources separately right now.
If you want to get them all in one zipped file and sign up for my email list for when I release new escape rooms, click the button below. (You can still get them for free when you click the button, but you’ll also see a name-your-price option if you’re feeling generous. No pressure, though!)
…Or download separately:
- Clue map—This flowchart summarizes the whole flow of the room. A clue map is a handy thing to have on hand for any escape room host.
- Spell book (PDF)—The game-specific pages I made probably won’t fit into your escape room exactly, but you can use all the other pages, printing and binding as many as you want. You can write or hide your own clues on those pages or just use them as a prop.
- Circled numbers that match the blanks in the spell book (various sizes)—If you use a version of the spell book with the circled numbers, you can mark the clues that fill those blanks in the room with these circled numbers.
- “Come inside” sign for the glow-in-the-dark clue in the closet—If you’re using a glow-in-the-dark clue in a closet or somewhere dark, you can print and use this as a clue to your players to turn off the lights.
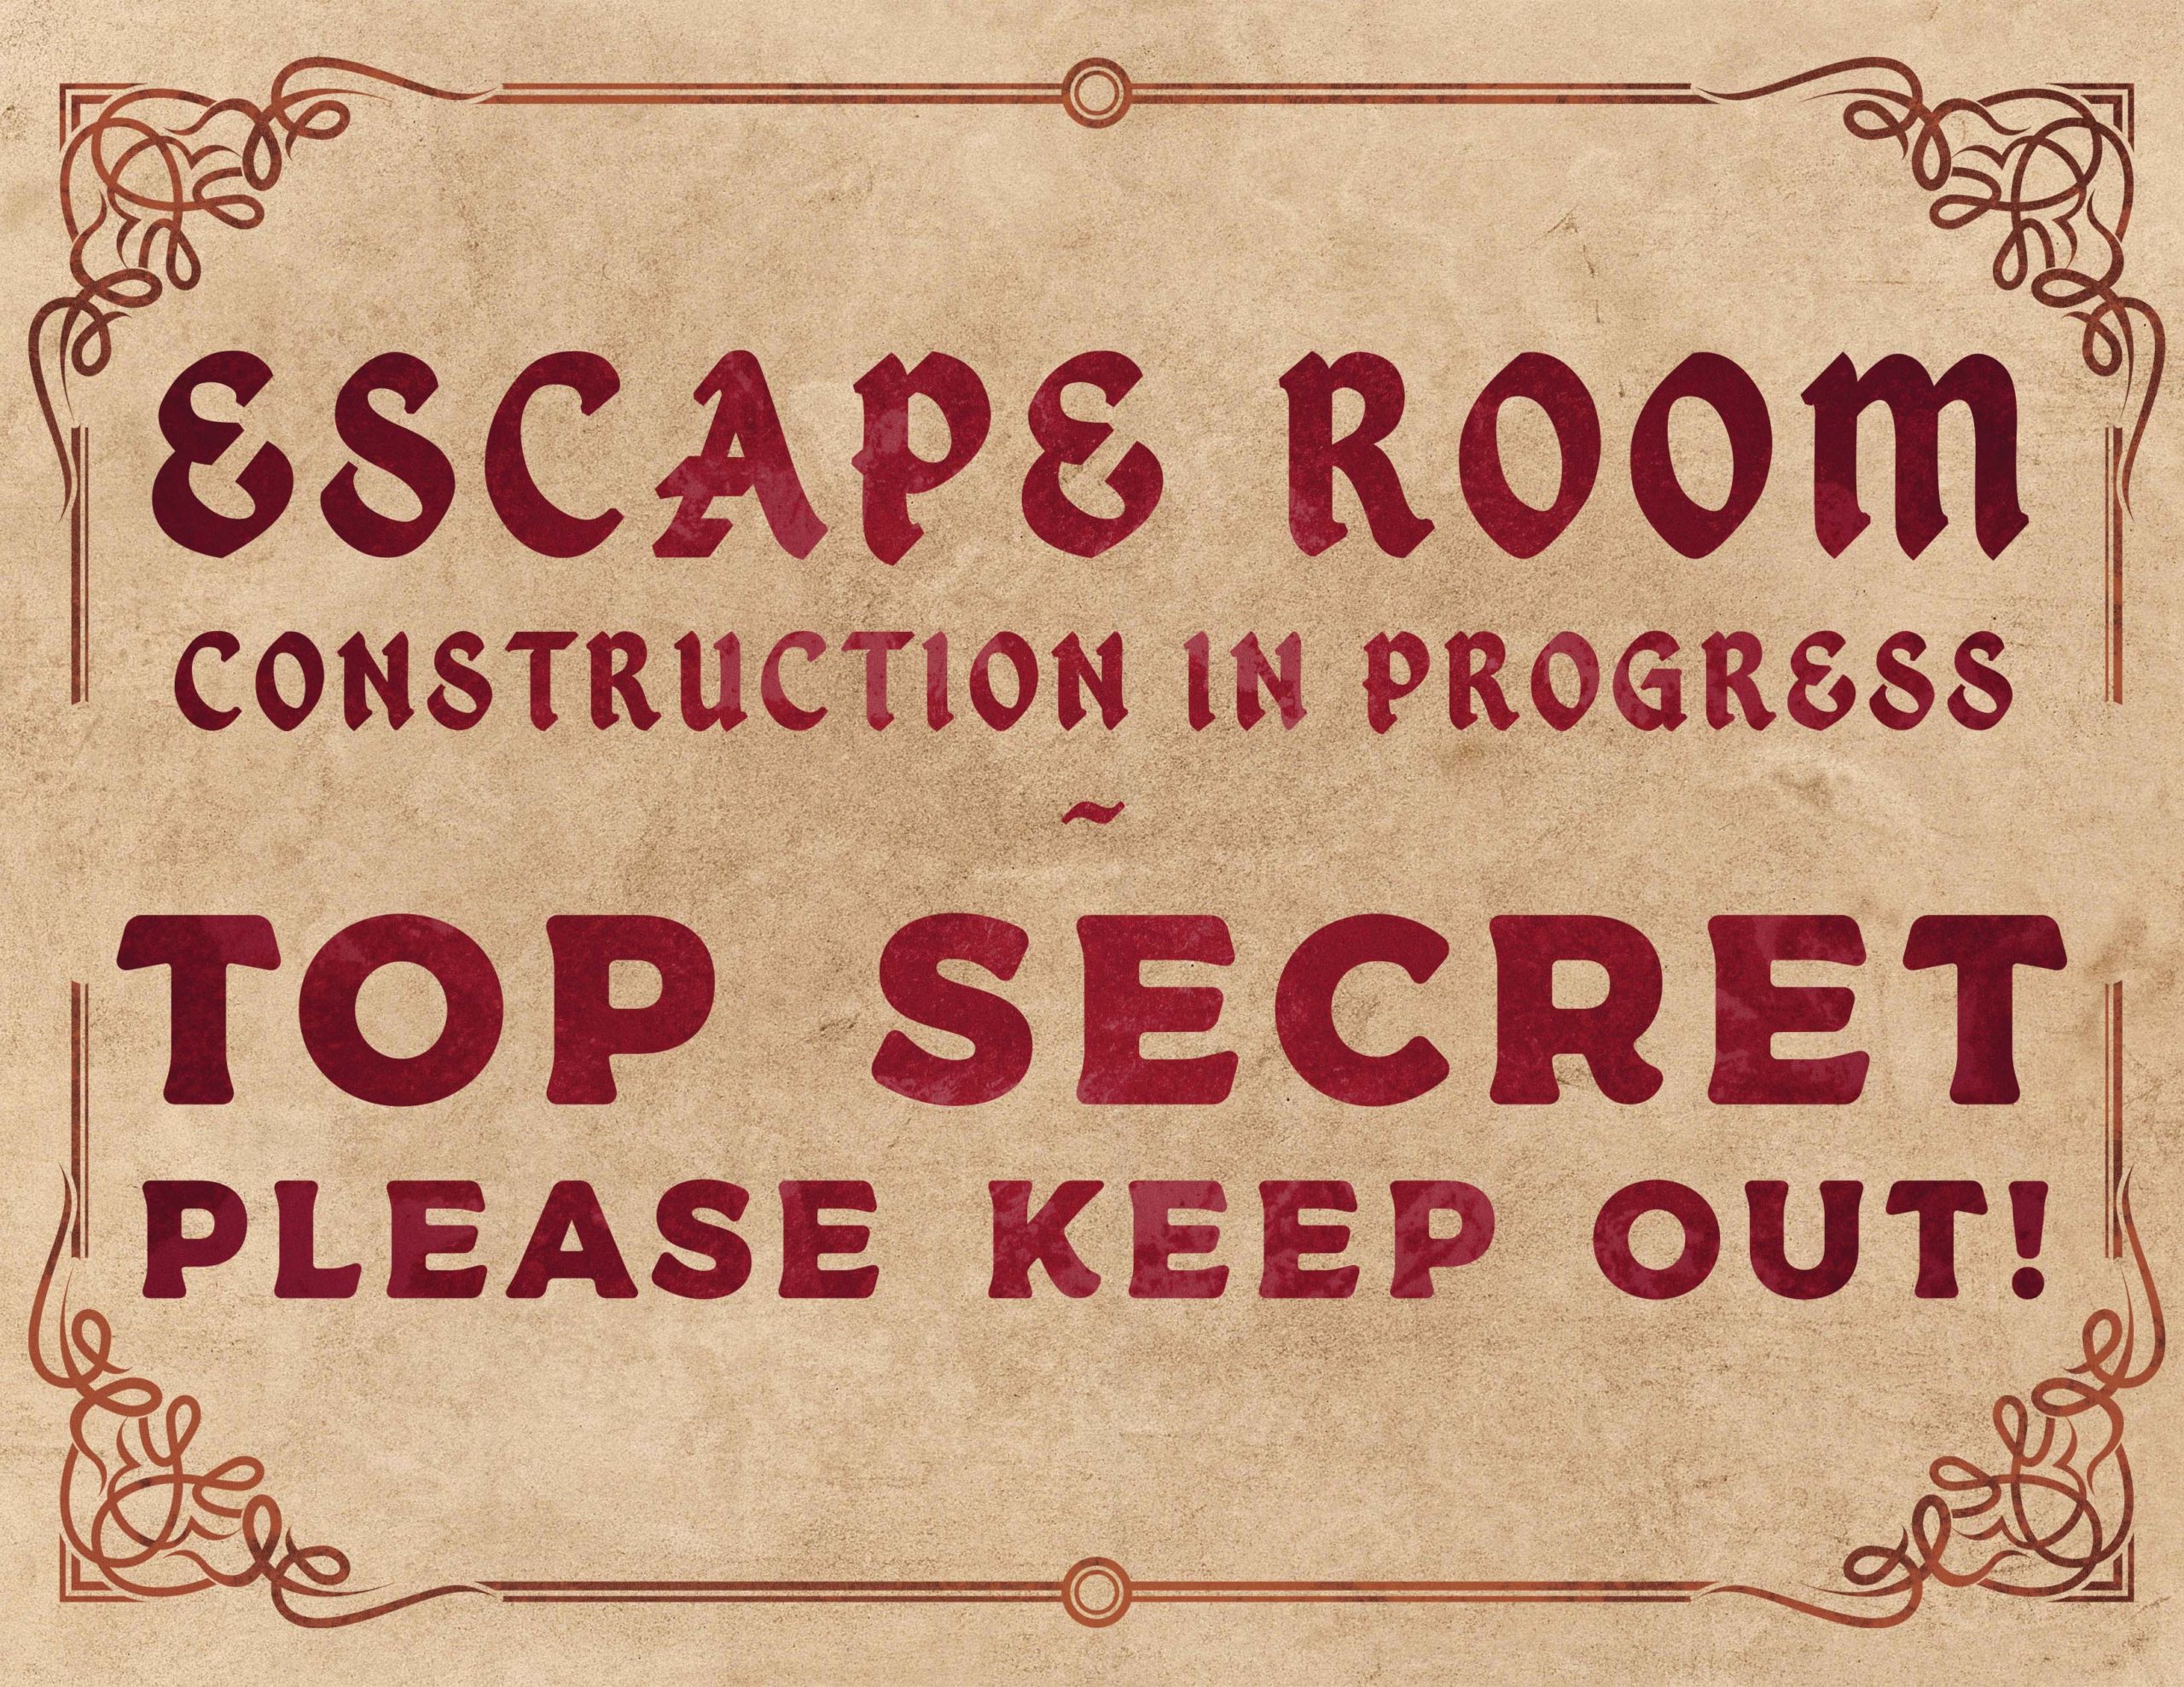
- An “escape room construction in progress” sign—I didn’t have this, but I totally would have used it, putting it outside the door the whole time I was setting up the game.
- Some “We escaped!” signs—After your players escape, it’s always fun to hold up signs and take a picture. These fit a wizard/magical theme, and some include some medieval-sounding vernacular. If some of it sounds random, it’s because it comes from one of our family’s favorite shows, Dwight in Shining Armor, which we highly recommend. A great show to watch for medieval/wizard/magic themed game/decoration/prop ideas, too!
- Mythical creature puzzles—You can print these stylized pictures of mythical creatures and make physical puzzles out of them. The small ones fit on the mini popsicle sticks that I used. The medium ones fit on standard sized popsicle sticks. The biggest ones fit on the giant popsicle sticks. You could also just cut the image up with scissors. You could write a message on the back, or have the image itself be the clue, like I did.
- Insight Potion label—To use this clue, print, cut, write a message on the back, and attach to a glass bottle or cup. There are several different sizes to accommodate different sizes of bottles.
- Mage script—An alphabet with the “mage script” symbols and the English letters they correspond to. You can also just download the font here.
- Mage script specific clue—The papers I used to make my “alpaca fluff” clue, if you want to use those specific letters.
- Potion ingredients list—A printable to make it easier to come up with fictitious potion ingredients. You can also see the online version here.
- Potion ingredient labels—You can print these, cut them out, and attach them to bottles or jars holding pretend potion ingredients. I printed them two-sided so the back also looked like old-style parchment paper.
- Do Not Touch sign—You can use this to mark any prop you want to call “magical” and don’t want players to touch (like something that sneakily disguises a HomePod).
- Audio riddle—This riddle gives a three-digit combination (285) that unlocks a pair of scissors, and works best if there are five dragon eggs somewhere in the room to hold. (On the page that opens when you click the link, right click the audio file and click “Save Audio As…”)
- Tips for players—A printable sheet of tips for escape room players (especially children).
Online purchases I made, or had made in the past (no affiliate links)
- Temporary wallpaper
- LED candle lights
- LED rainbow lights
- Leather photo album
- Push button lock
- Animal skeletons
- Cryptex
- Old-timey combination lock
Tutorials I used
- Painted dragon eggs, a tutorial from Becca Beach
- Fake “caviar”—edible fish-egg looking food that would make a great potion ingredient, from Sprinkle Bakes
- A video of a magic-themed escape room for adults, from the show Escape! with Janet Varney from Geek & Sundry. It gave me some ideas for the potion puzzle (and was fun to watch)
Credits
- Dragon drawings in the spell book were from Poci16 (here and here).
- Mukundwa K. was the voice actor who recorded the lock combination riddle.
- Dragon outline for the spell book cover
- Mage script font
Hi! I was wondering if this escape room would still work with seven, middle school girls? I wasn’t sure how best to divide the group and was hoping they could all do it together. Any advice on this? Thank you!
Hi Chris! So I don’t know if you’d be able to run this room exactly that way, but with some modifications, you could definitely run it with seven middle school girls. I think they key would be to make sure there is enough going on so that they could divide and conquer (so actually similar to this room, how it was divided up into 6 mini puzzles that could all be done at the same time). They might need some guidance to kind of encourage them to split up and work together in smaller groups on the separate puzzles. I would maybe aim for 3 or 4 smaller puzzle chains that could be worked on simultaneously. Then all the puzzles would come together for one final solution. A lockout hasp is an easy way to do this – just attach it to something like a box or door, and lock it with three or four separate keyed or combination locks, and each pair or group of girls can work on opening one of the locks individually. If you want to incorporate a puzzle like the potion one and want to let everyone participate, maybe you could let each of the mini puzzles involve making its own potion, so all the girls get to use the potion counter for their own potion to mix and drink. I think the key is just making sure there is enough to do so no one gets bored. Does that help?
You beautiful soul! I did a very “first timers escape room” over Christmas break and the kids LOVED it. When my daughter asked if we could do another one for her birthday I started looking and have been so blessed and fortunate to have found your site. You are such an angel to share all of your great ideas for the Wizard Escape Room. I can’t believe how much work you put into this! Thank you from the bottom of my heart for sharing your amazing skills – you’re saving me hours! I’ll have to come back and let you know how it ends up working out.
Oh thanks Tenya, that’s so nice of you to say! I’m glad I was able to help, and I’d love to hear how it goes!
This was amazing – thank you so much for all the detail and for sharing your hard work! It was my first time trying an escape room, and I followed pretty much everything you suggested. The group of 9 girls over for my daughter’s 11th birthday had so much fun. Thank you, thank you!
That’s great, Stefani! I’m so glad it went well.
This is AMAZING! I feel so guilty that we are able to use it without restrictions! Your ideas are so good and the props seem authentic yet very doable. Thank you so much for letting us use your “wheel” so we don’t have to reinvent it!
No problem, Teresa! I hope you’re able to make some fun memories!
This is absolutely awesome and I can’t wait to try it out. Thank you so much for all the details and resources provided. You are amazing!